Making a new project
This is a guide how to create a new project with your own data.
Preparing multimedia assets
How to get your multimedia data ready to add to your AVA360VR project as assets.
Synched versus unsynced media files
All the synced audio and video clips to be used in a project need to be synced together so that they have the same IN and OUT points and therefore they are all of the same time duration. This must be done outside of AVA360VR. We have produced an online video that gives instructions how to synchronise multiple video files and export them as clips with identical IN and OUT timecodes in a non-linear video editor.
Synced 360 video clips
- The resolution and bit rate of the 360 video should be as high as possible, otherwise the video playback will be blocky and blurred in VR. Use the raw 360 footage and render at a high bit rate using the camera software (or dedicated stitching software such as MistikaVR).
- The dimensions of the 360 video should be 4K or UHD, eg. from 3840x1920 up to 4096x2160. Video at higher resolutions, eg. 8K or 6K, is not supported.
- Stereoscopic 360 video is not supported in this release.
- Stitch the raw footage carefully so that the stitch lines between lenses are not too visible.
- With mobile 360 cameras use stabilisation while filming or stabilise later in the camera software. MistikaVR has tools for re-stabilising, but it is not free and it takes some effort.
- If AVA360VR does not recognise your audio or video file and cannot import it, then you may need to reformat it using a standard codec for MP4 or WAV, for example.
You can use any non-linear video editor (e.g. Adobe Premiere Pro or Final Cut Pro) or cross-platform free open-source software such as HandBrake to export the video into the new format.
Choose a standard preset such as
Video You Tubeand select a similar size and framerate to the original. You may need to experiment to find the best quality. - The video playback may be choppy with some latency.
Synced audio clips
- Audio clips can be added with
WAV,OGG,MP3format. - Ambisonic audio is not supported in this release (but audio in AVA360VR is spatialised).
Unsynced audio and video clips
- Audio and video files that are not synced to the master 360 video can be added and imported. They should be in a suitable format as above.
Transcripts
Transcripts should be prepared with our software DOTE (Distributed Open Transcription Environment), which is currently in beta-testing (as of May 2021). The transcript projects prepared with DOTE can be opened natively in AVA360VR. First, create a transcript that is synced to the master 360 video for the AVA360VR project you have created. The DOTE transcript project can be created in the Transcript folder and it will automatically be readable within AVA360VR. Moreover, it can be edited live in DOTE on the desktop and refreshed in real-time in the transcript viewer in VR.
Images
- Images can be imported if they are in standard formats such as
PNG,GIForJPG. The size of the window displaying the image that is imported in AVA360VR is proportional to the dimensions of the image.
3D models
- 3D models (with textures) for AVA360VR should be in
FBXorOBJformat as one file. Some models may not be importable, or if they are, then the colour textures may be missing.
Creating a new project
It is recommended that you store all of your related projects in the same root folder, eg. MY AVA360VR PROJECTS.
If you do this, then you can easily jump between projects while in VR using the analysis mapping tool.
After loading AVA360VR, choose Create Project, then select the root folder where all your projects will be stored on your drive, type the project name, select the 360 video file you wish to make the master 360 (it will be copied into the new project automatically), and lastly, give a name for your first analysis.
You can have many analyses in one project, eg. each with a different combination of visible video clips, audio clips, drawings, animations, etc..
And you can have multiple versions of the same analysis, eg. indicated with the postfix -NNN, where NNN is an incremental number.
Once the project is created, you can then open any of the analysis versions you have created, reduplicate an analysis version or start a new analysis in the same project.
Each project should contain copies of all the files that available to be imported. The files should be copied into the appropriate folder. Some of these folders will also be where any exported files (eg. recammed 2D video clip, keyframe sequences, screenshot, comic panel generator) will be stored.
Adding files to the new project
Every AVA360VR project has the same folder structure as shown in the following diagram.
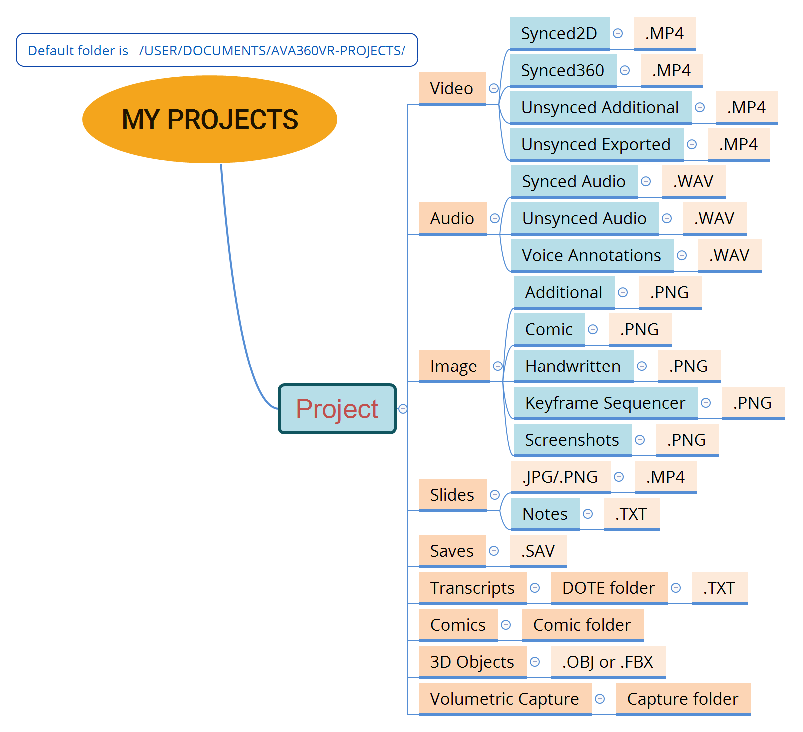
If you named your project MY PROJECT, then every subfolder is important and should not be renamed.
This folder structure will guide you into which folders you need to copy all the files.
When you created the project, the master 360 video was copied automatically to the correct subfolder MY PROJECT/Video/Synced360/.
With the folder structure generated, you will need to populate it with your assets, ie. copy any other audio-visual files into the correct subfolders.
For example, if you have a synced audio file (eg. a wireless microphone), then copy the file into the MY PROJECT/Audio/Synced Audio/ subfolder.
Importing assets in AVA360VR
Once you have completed copying manually all the relevant files, then they will be available in AVA360VR from the IMPORT menu on the left controller.