Two backup systems are better than one!
DOTE has two different and independent backup systems to keep track of your editing work and to support reliable backtracking to an earlier version. Grand! 🎊
Watch the basic and advanced video tutorials on YouTube for more details.
The backup systems will enable a user to restore a prior state of a transcript at a particular point in time, including the transcript text, sync-codes, video-cues, named subtier types, transcript-clips and some local Editor settings in Transcript Options.
Autobackups are auto-generated and provide a simple backup in case one is not saving the current Transcript frequently. On the other hand, Checkpoints are a user-driven system of backup that is semantic and timely.
Note that Autobackup is not the same process as saving a Transcript using File ➔ Save Transcript or CTRL+S [or ⌘+S on macOS].
Autobackup makes a new copy of the current Transcript and writes that to disk so the previous state can be recovered, while saving writes the Transcript data to disk.
Autobackup does not save the current Transcript automatically; that is a manual decision by the user.
It just makes a series of backup copies at regular intervals only if there are any new changes since the last one.
We strongly recommend you try Checkpoints when using DOTE, especially since checkpoints will support informative, fine-grained control over the changes you make as you transcribe.
Although they both involve the user in making meaningful comments, Checkpoints and Transcript Clips do not have the same function. Checkpoints are useful for tracking the changes you make to a transcript as you edit it in order to leave a trace of the substantive changes that would otherwise be forgotten. Transcript clips are useful for making notes and annotations on the transcript as you analyse it.
It is important to note that you should not rely on Autobackups; you should still frequently manually save your editing of a transcript:
- If no new Checkpoints have been made and Autobackup is turned off, then any unsaved changes will be lost if the computer or DOTE crashes, for example. Hint: save your work frequently and make checkpoints regularly.
- If Autobackup is turned on, but the Autobackup time interval has not been reached, then the most recent changes made since the last autobackup will not be recoverable if the computer crashes, etc. Hint: save your work frequently.
Setting up Checkpoints and Autobackups
There is nothing to setup in v2.0. It now works out-of-the-box.
Note that the Checkpoint system uses a special version control system behind the scenes on your desktop computer, namely Git. Git is a secure, free, open source software with absolutely no advertising or spyware. DOTE implements a simple version control for a single user, but experienced users could also use GitHub and a Git GUI to collaborate on shared transcripts in a distributed manner.
Autobackup and restoring a Transcript
Autobackup is built into DOTE in the following manner:
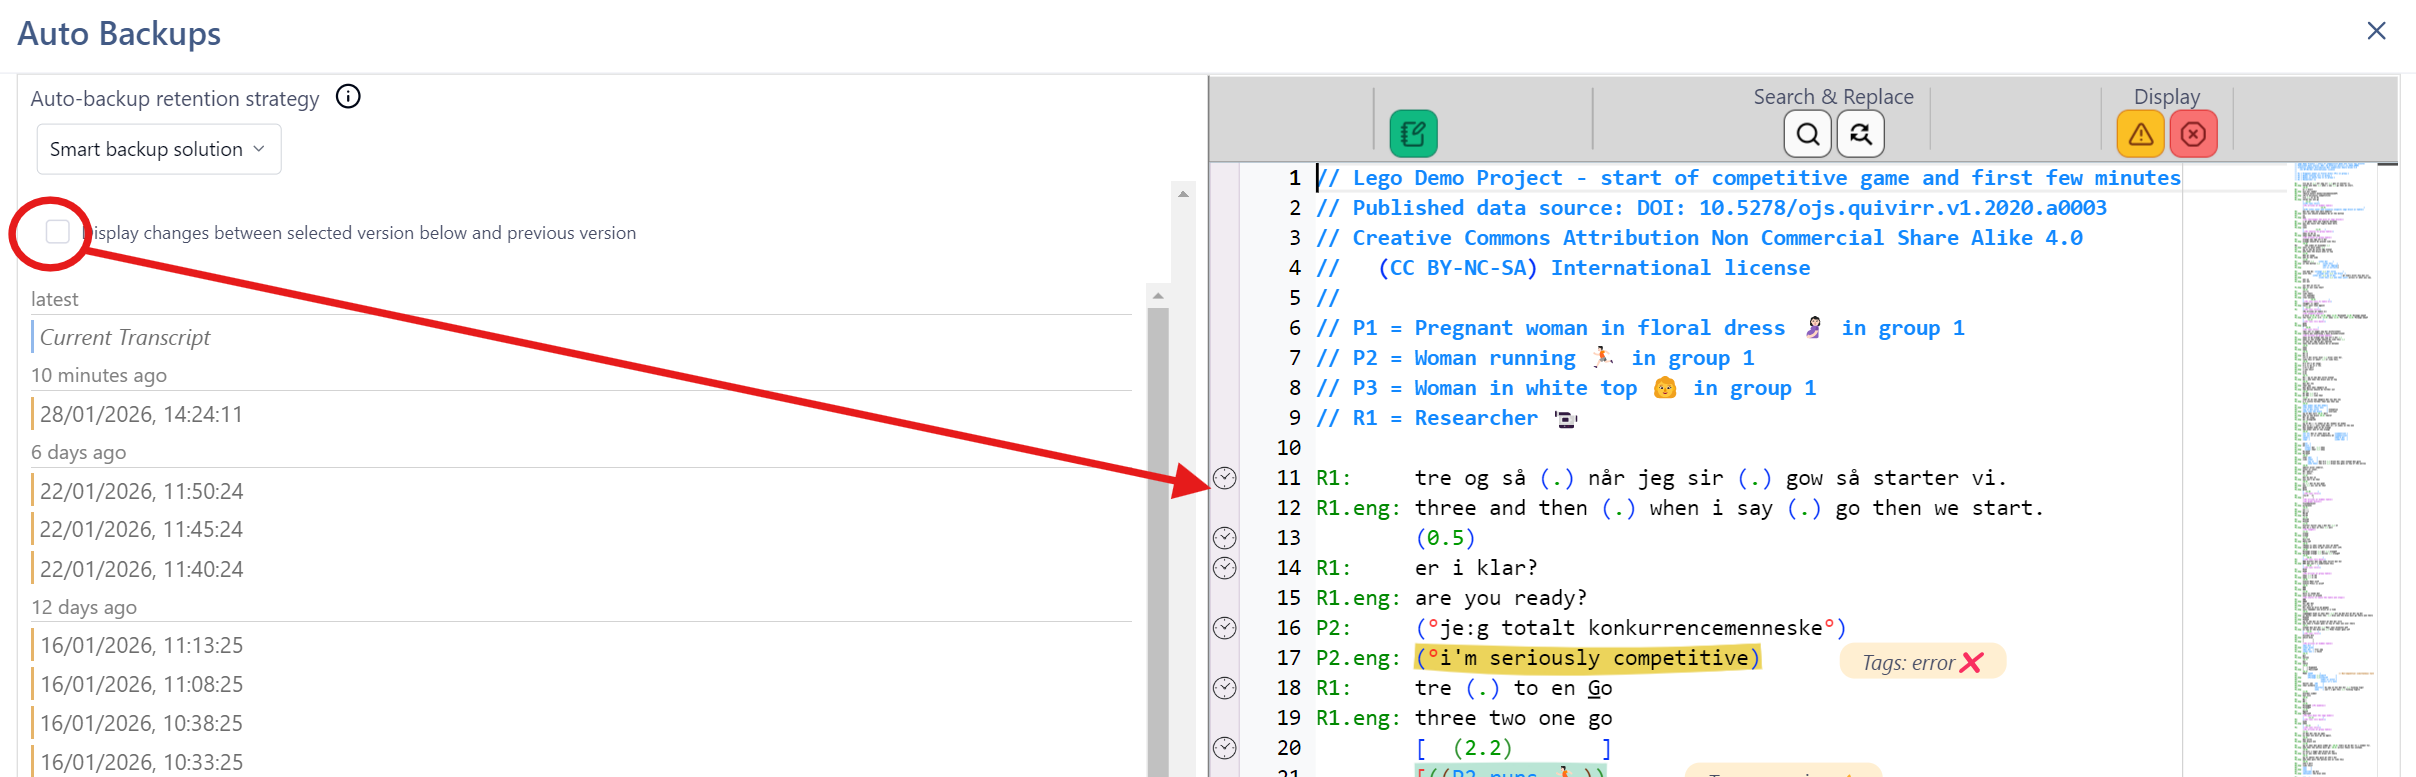
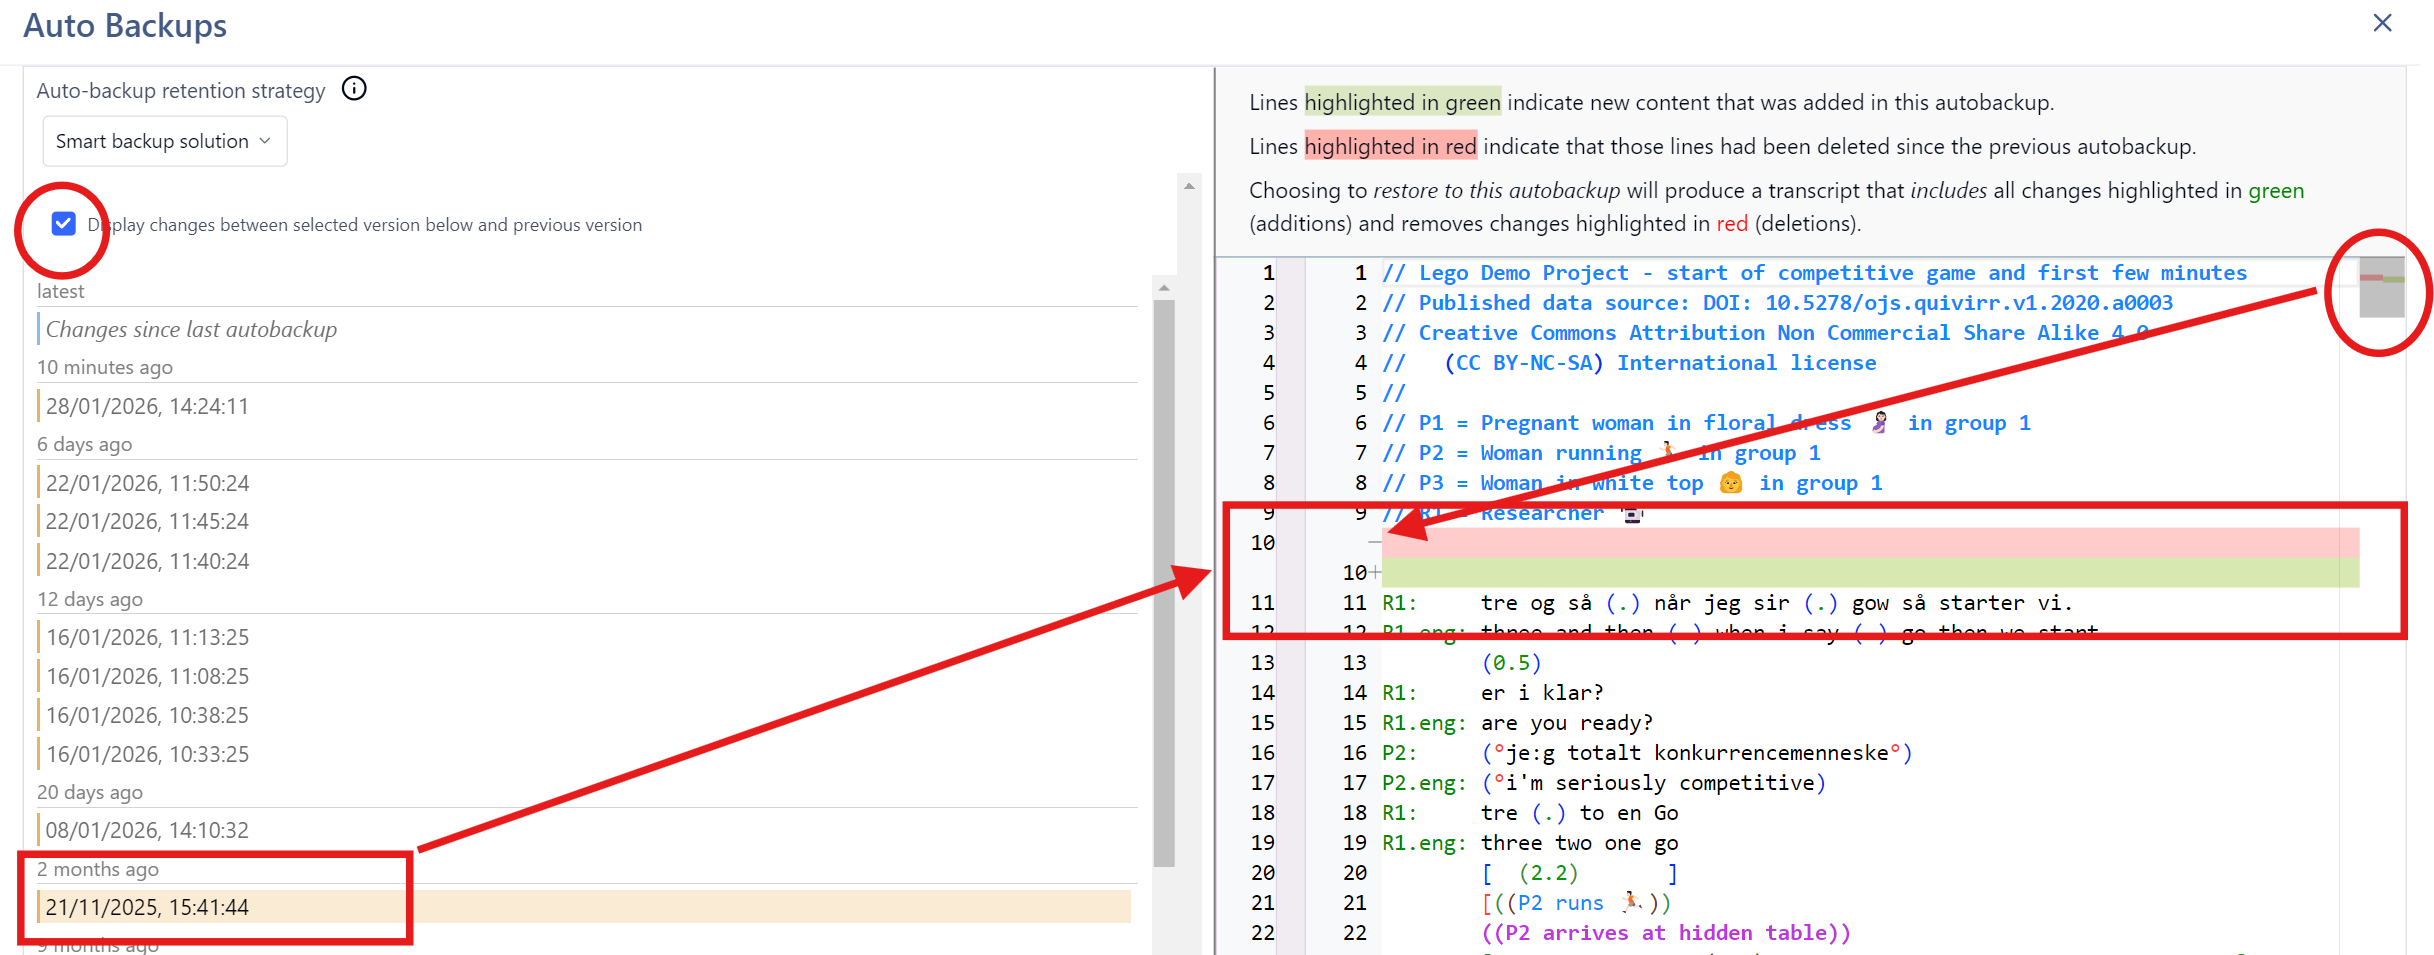
- The default autobackup is every 5 minutes, but this can be changed in Settings. Autobackups are stored in a hidden folder in the transcript folder, but DOTE has its own interface for listing all autobackups and peeking at the state of the Transcript at a specific autobackup.
- By clicking on
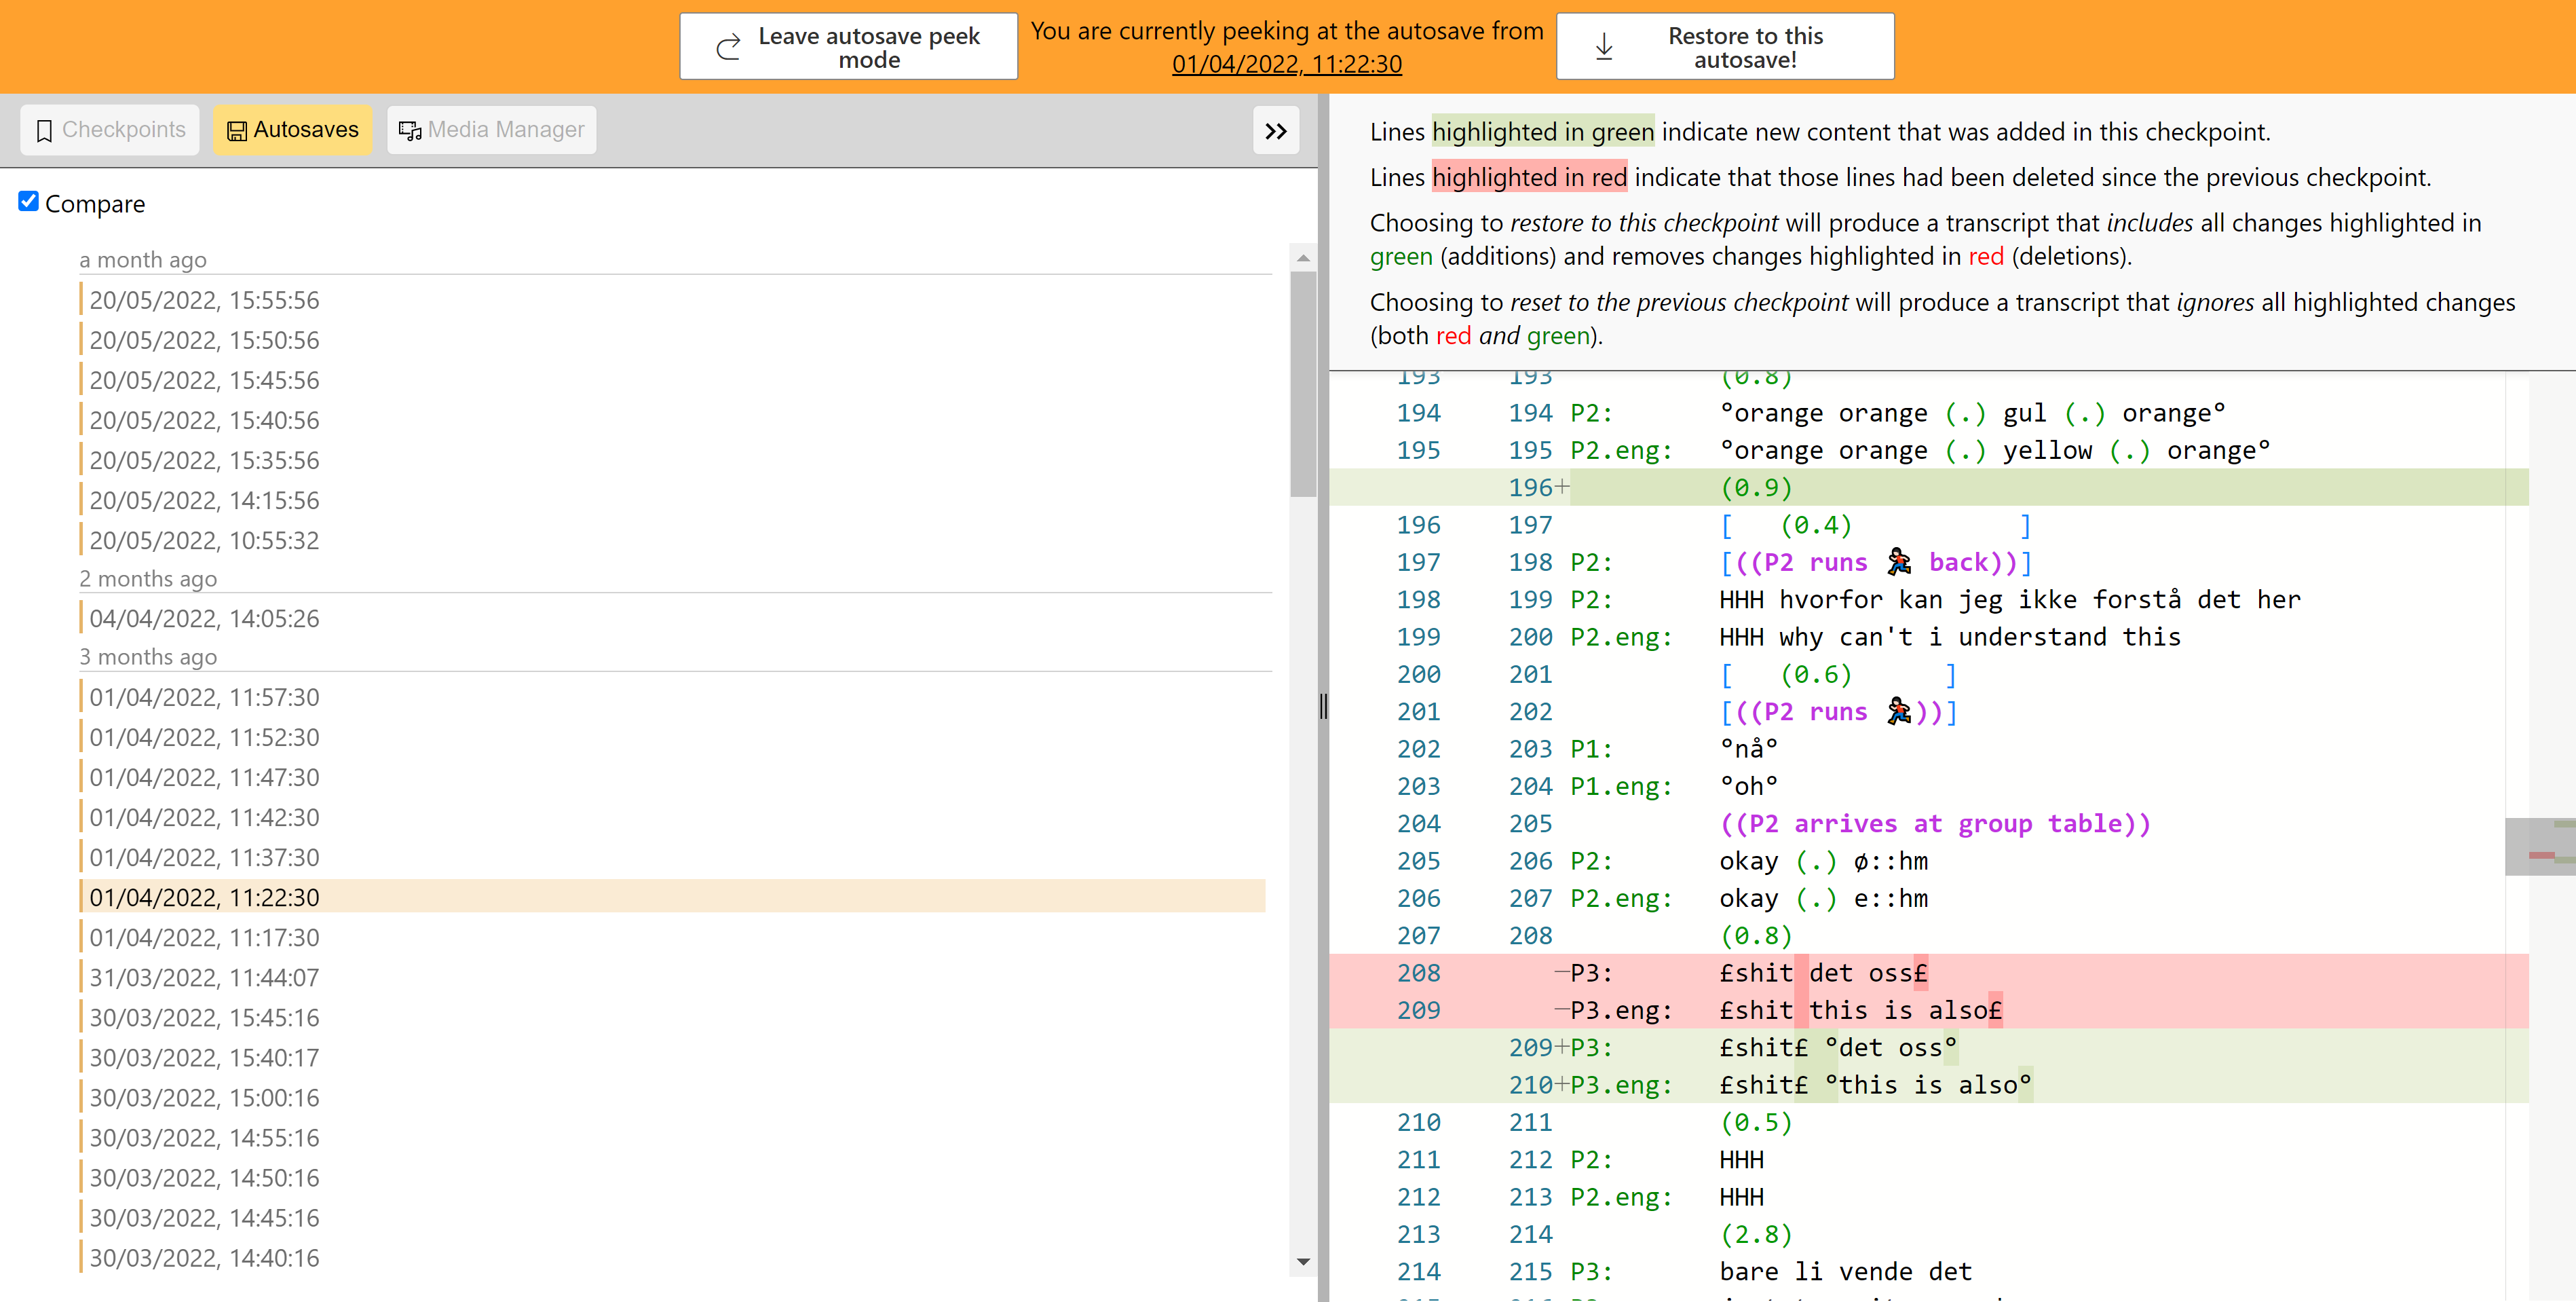
Autobackups, a user can peek at any prior autobackup and play the video and scroll through the transcript as it was at that autobackup. Editing while peeking is not allowed. - The user can then decide to restore an earlier version of the Transcript (the state of the Transcript up to and including the peeked autobackup) or to reset to an earlier version up to but not including the changes in the peeked autobackup. If neither, then one can just return to the current state of the Transcript before peeking at the autobackups.
- If a user does decide to restore an earlier version, then it is loaded as the current Transcript, but all autobackups up to the present moment are retained; it is non-destructive. Thus, the user can decide later to restore to a version that came after the restored version.
- Autobackups can be pruned following a retention policy.
- Sometimes a user will have to create a Checkpoint before restoring an earlier Autobackup, otherwise the unsaved changes will not be stored in the checkpoint system. The user can also decide not to do this and just restore while discarding any unsaved changes.
- After restoring an Autobackup, there will be unsaved changes ("non-recorded state") in the Checkpoints. This is because the new state of the Transcript will not match the last Checkpoint state and the differences will have to be checkpointed as new unsaved changes. Thus, after restoring the Autobackup, DOTE will automatically create a new Checkpoint with a message that highlights that a specific Autosave restore was completed. Autobackups and Checkpoints are independent version control systems.
- After the restore is complete, the Transcript will be opened.
- Also, a new Checkpoint will be created automatically with an informative message to mark that all the new changes in the Transcript are the result of restoring a specific Autobackup.
Using Checkpoints while editing a Transcript
How to use checkpoints
Watch the video tutorial on YouTube.
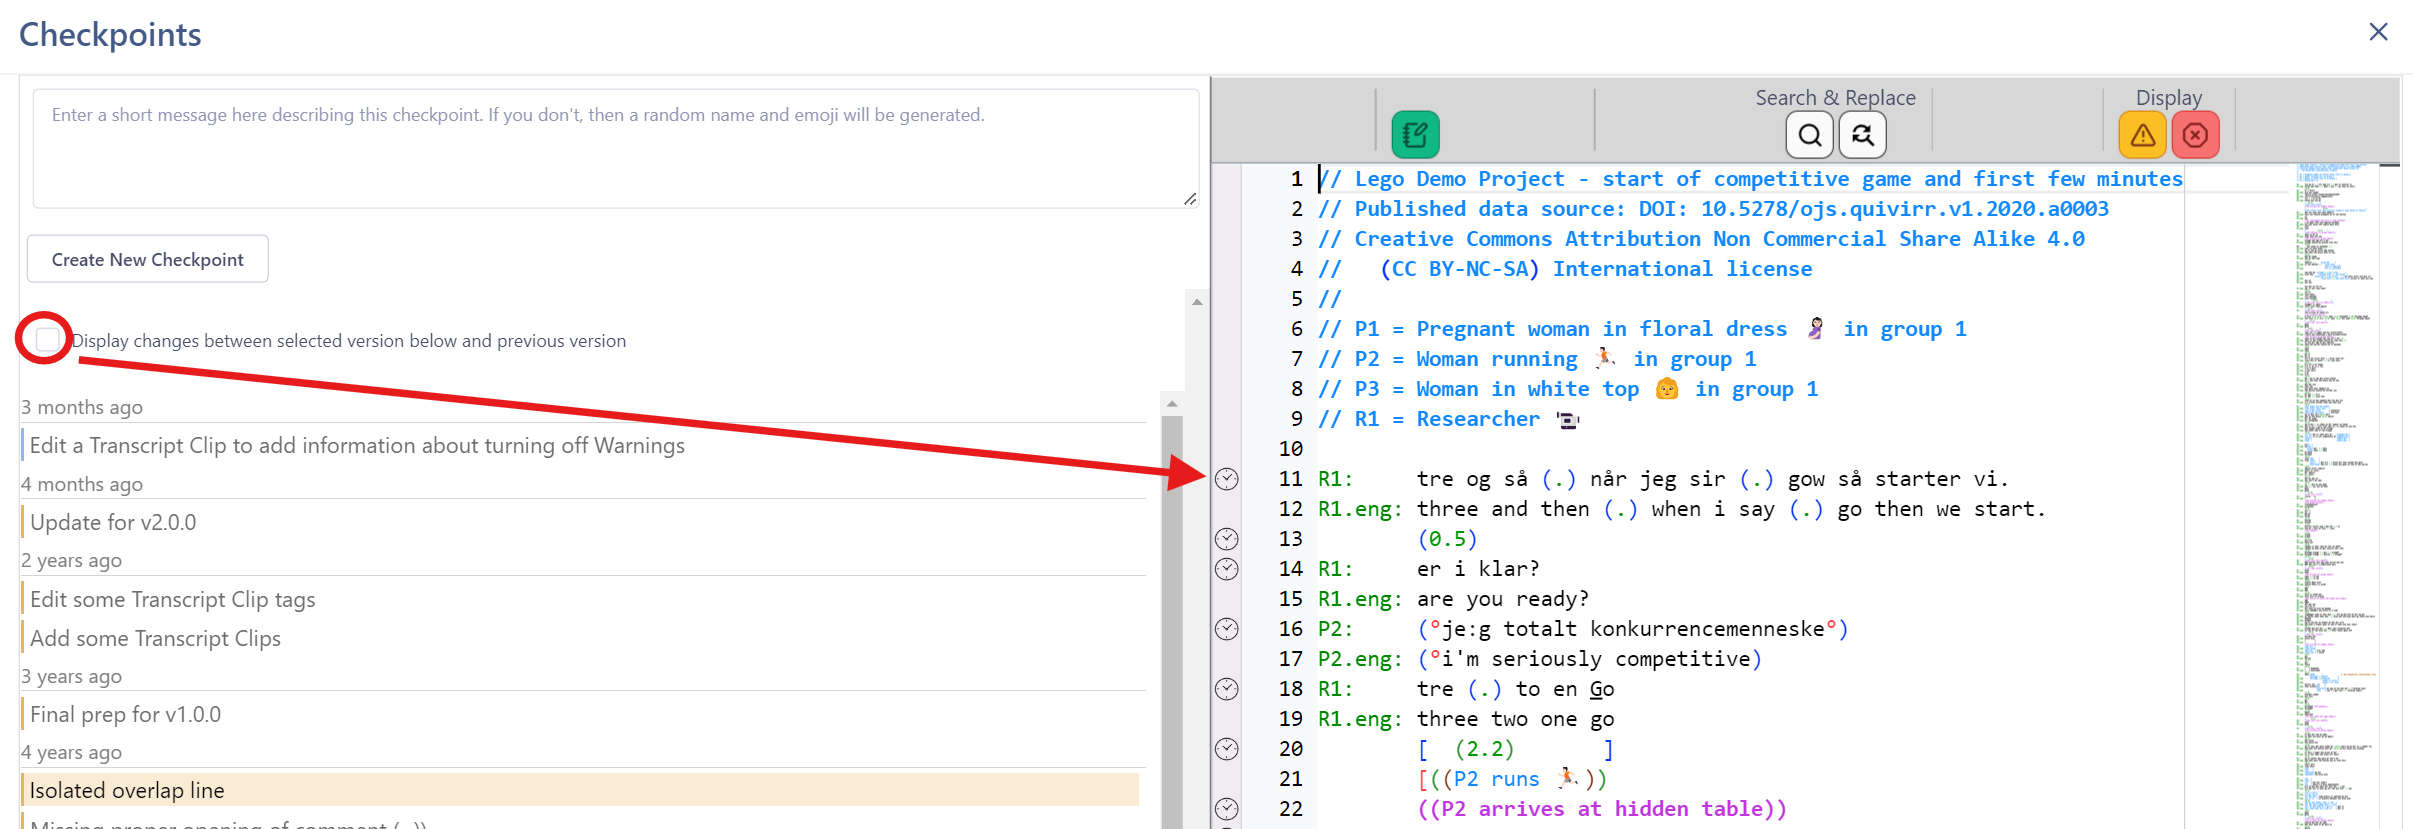
- At any time, you can click on
Checkpointsand see a list of prior checkpoints for the current transcript. - After making some meaningful changes to a transcript, it is a good idea to create a new checkpoint. If there have been changes made (unsaved or saved) since the last checkpoint, then this is noted as a "Non-recorded state".
- A user can then type in a message that will be attached to a new checkpoint after selecting
Create Checkpoint. If no message is given, then a random three word + emoji phrase is added instead. - When a new checkpoint is created, the Transcript and Project is also saved to disk in the usual way.
- As with autobackup, a user can peek at an earlier checkpoint and play the video and scroll through the Transcript exactly as it was displayed when that checkpoint was made. Editing while peeking is not allowed.
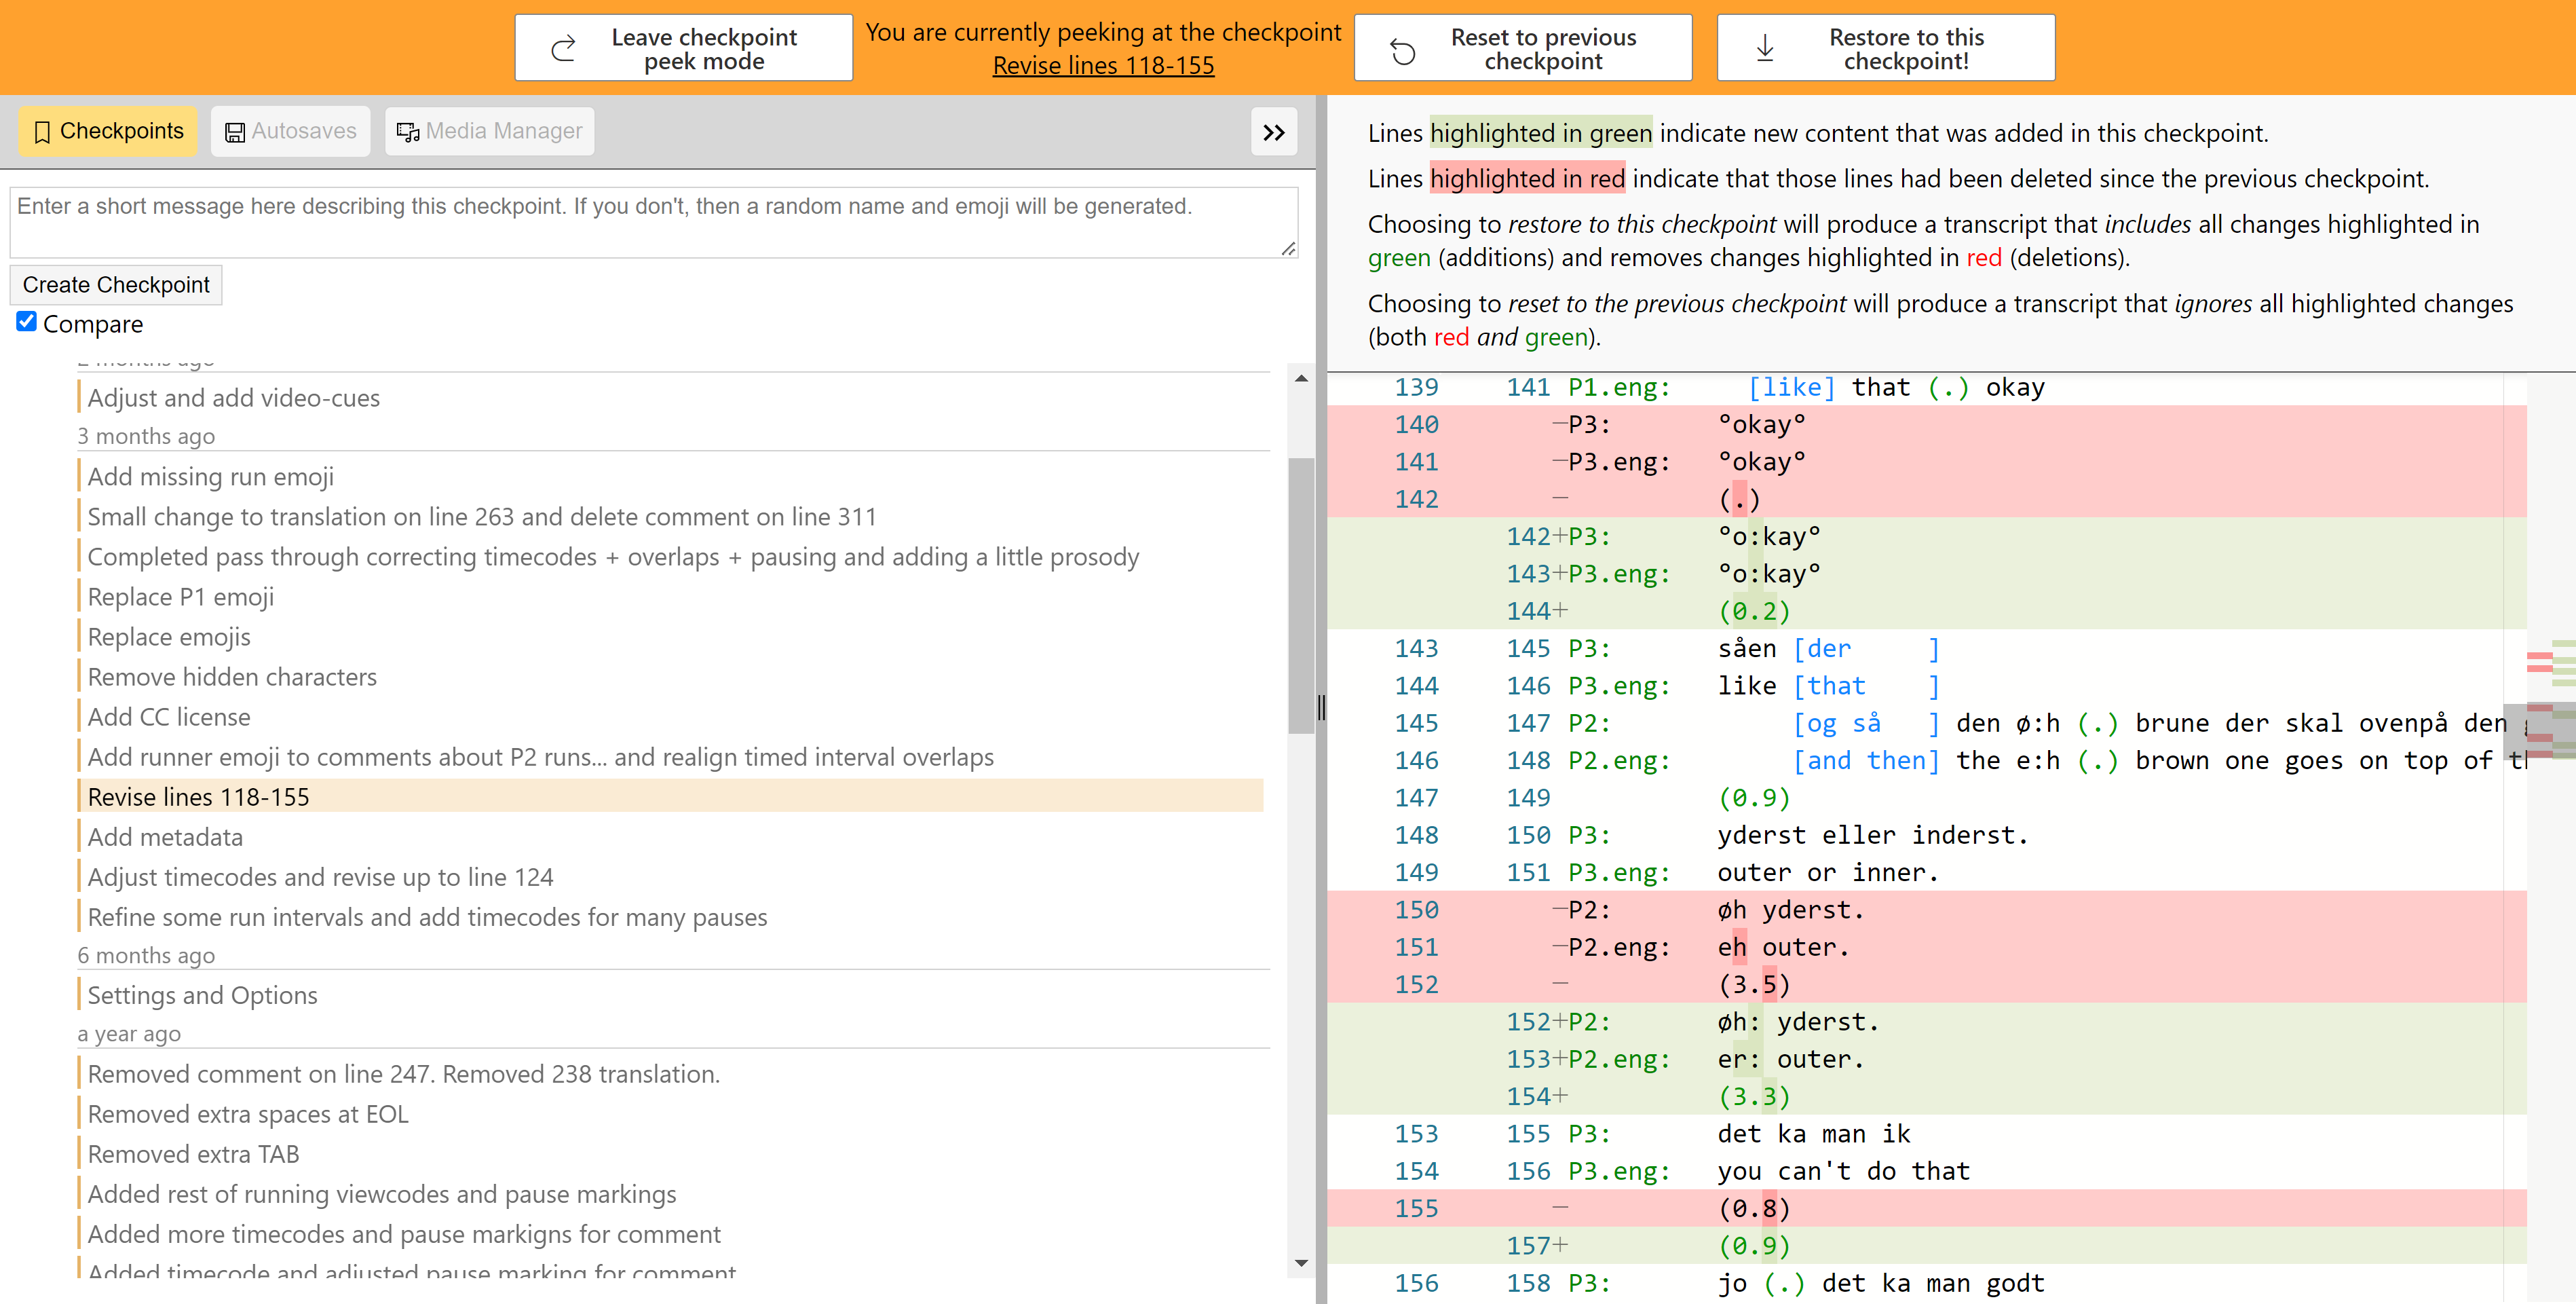
- The user can then decide to restore to an earlier state of the Transcript up to and including the peeked Checkpoint, or to reset to the earlier state prior to the current peeked Checkpoint, ie. not including the changes in the peeked Checkpoint.
- Whichever is chosen (restoring or resetting), then there are two choices:
- Restore or reset to the selected checkpoint and discard all later changes (eg. all later checkpoints are lost).
- This is destructive.
- However, the list of autobackups will not be pruned.
- After resetting is complete, the Transcript will be opened.
- Spin off a new Transcript in the Project to match the state of the Transcript at the selected checkpoint.
The user will be asked to give a name for the new transcript.
- This is non-destructive since the original transcript will still exist in the project and can be reopened.
- Only the checkpoints prior to the selected checkpoint will still exist in the new Transcript.
- Note that after creating a new transcript, the checkpoints before the restored checkpoint will remain in the list, but the list of autobackups is reset and starts again from scratch.
- The user will be prompted to save any non-recorded state changes in the original Transcript.
- The new Transcript is automatically opened in DOTE.
- Restore or reset to the selected checkpoint and discard all later changes (eg. all later checkpoints are lost).
NOTE: Peeking at or restoring/resetting checkpoints (and autobackups) can take some time, depending on several factors, including the access speed of your storage device. This could take more than 1 second, sometimes more than 5 seconds.
Comparing checkpoints and autobackups
DOTE provides a user interface to display exactly what has changed in the Transcript between specific autobackups as well as what has changed in the Transcript between specific checkpoints, eg. between the current version of the Transcript and the previous checkpoint version.
Comparing checkpoints
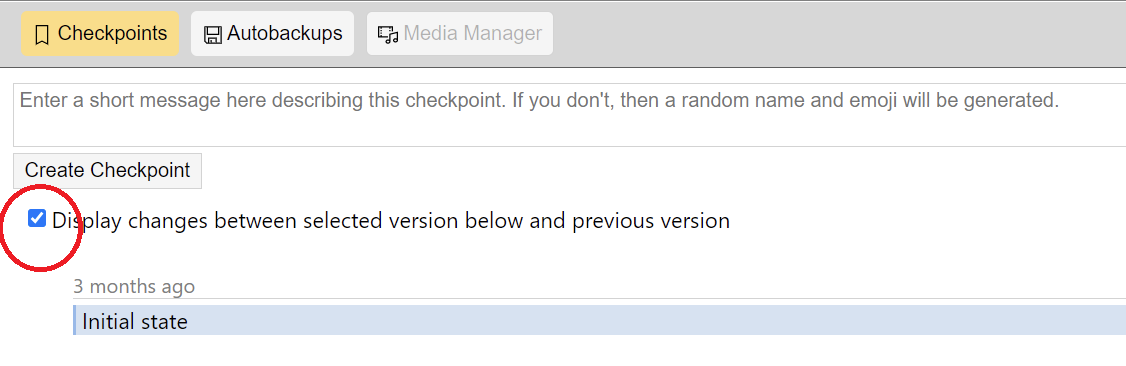
- Open
Checkpointsfrom the ribbon bar. - By default, the Compare function is toggled on (see tick box). You can turn it off and on as you see fit.
- If you turn Compare mode off, then you will see the Transcript and sync-codes, which you can use to jump around. The current audio track will be playable (but the video will not be visible). And you can use Find to locate a text string in the earlier version. Because you are only peeking at an earlier version, the Transcript and the sync-codes will not be editable.
When it is toggled on, the Compare function displays several bits of useful information:
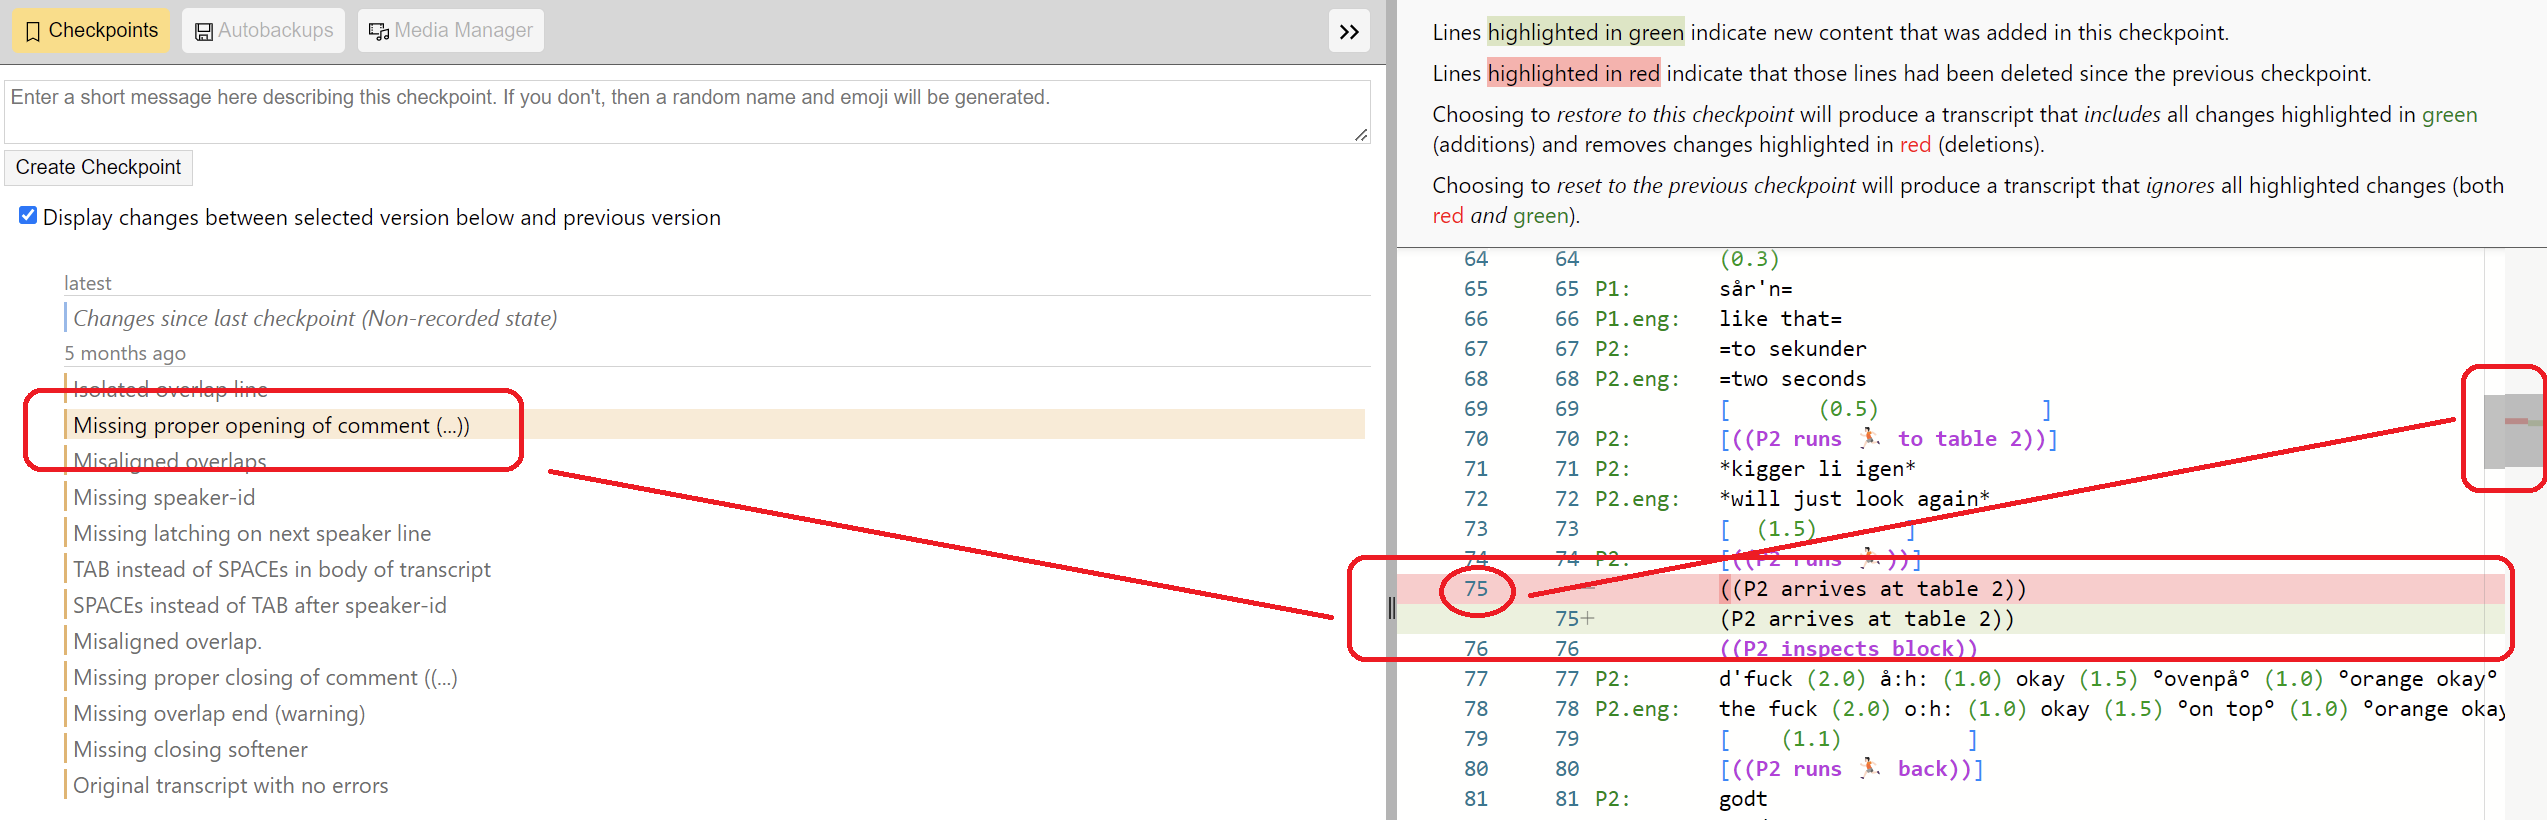
- By default, the comparison displayed on the right panel is between the current state of the Transcript (saved or unsaved) and the state it was when the last checkpoint was made.
- If you select and peek at a specific checkpoint in the past, then the comparison displayed is between the peeked checkpoint and the previous one.
- The two lists of line numbers on the left of the panel represent the line numbers for the previous and current states of the Transcript respectively.
- If a line is added or changed in the current checkpoint, then it is marked in green with a green
+. - If a line is deleted or changed in the previous checkpoint, then it is marked in red with a red
-. - Any additions on a line are marked in a darker green, and any deletions on a line are marked with a darker red.
- The changes are highlighted in the scroll bar minimap on the right side of the panel.
- Thus, one can instantly see what was changed in the transcript from one version to the next and where those changes are in the Transcript as a whole.
- Note: If you restore or reset the Transcript to match the Checkpoint that is being peeked, then the highlighted changes in green will be included in the restored Transcript.
Be patient with the updating when switching between checkpoints. There is a lot of file processing involved in recovering the Transcript history over time, so updates may sometimes take a second or two depending on the power of your computer.
In future releases, one will be able to compare any checkpoint with any earlier checkpoint (non-consecutive), as well as display the changes in different formats using search and marking authorship.
Comparing Autobackups
- Open
Autobackupsfrom the ribbon bar. - By default, the Compare function is toggled on (see tick box). You can turn it off and on as you see fit.
- If you turn Compare mode off, then you will see the Transcript and sync-codes, which you can use to jump around. The current audio track will be playable (but the video will not be visible). And you can use Find to locate a text string in the earlier version. Because you are only peeking at an earlier version, the Transcript and the sync-codes will not be editable.
When it is toggled on, the Compare function displays several bits of useful information:
- By default, the comparison displayed on the right panel is between the current state of the Transcript if there are unsaved changes and the state it was when the last autobackup was made.
- If you select and peek at a specific autobackup in the past, then the comparison displayed is between the peeked autobackup and the previous one.
- The two lists of line numbers on the left of the panel represent the line numbers for the previous and current states of the Transcript respectively.
- If a line is added or changed in the current autobackup, then it is marked in green with a green
+. - If a line is deleted or changed in the previous autobackup, then it is marked in red with a red
-. - Any additions on a line are marked in a darker green, and any deletions on a line are marked with a darker red.
- The changes are highlighted in the scroll bar minimap on the right side of the panel.
- Thus, one can instantly see what was changed in the transcript from one version to the next and where those changes are in the Transcript as a whole.
- Note: If you restore or reset the Transcript to match the Autobackup that is being peeked, then the highlighted changes in green will be included in the restored Transcript.
Be patient with the updating when switching between autobackups. There is a lot of file processing involved in recovering the Transcript history over time, so updates may sometimes take a second or two depending on the power of your computer.
In future releases, one will be able to compare any autobackup with any earlier autobackup (non-consecutive), as well as display the changes in different formats using search and marking authorship.
Pruning Autobackups
A common problem with Autobackups is that without due attention the number of backups keeps increasing. Each Autobackup does not take up much space on disk, but still the list can grow long. A retention policy is needed.
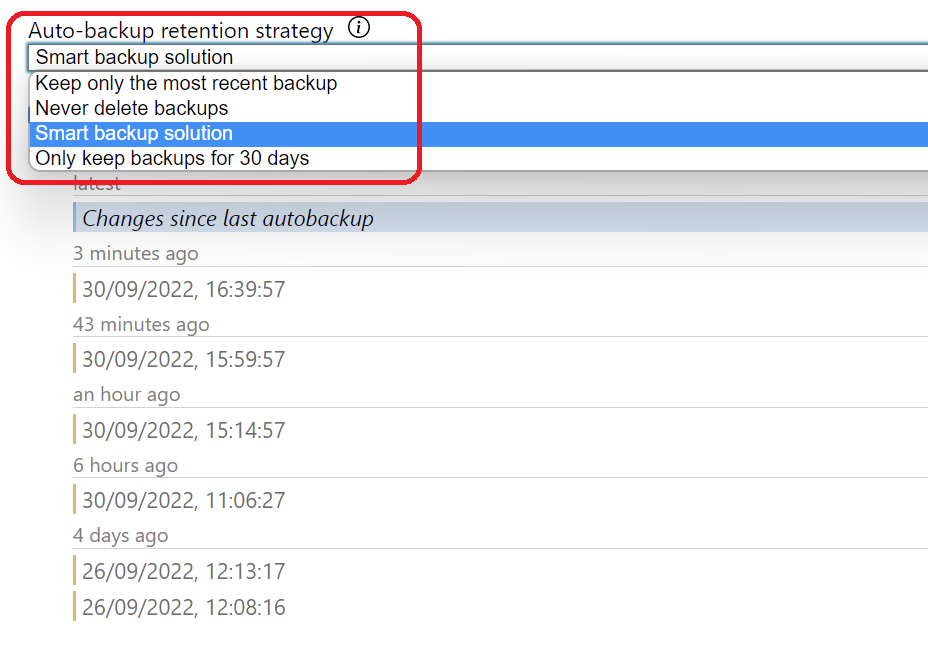
In the Autobackups panel, DOTE offers 4 strategies to deal with this issue:
- "Keep only the most recent backup" - only one backup is kept, so if one has set an autobackup to be made every 5 minutes, then this option will only retain the most recent changes within at the most the last 5 minutes.
- "Never delete backups" - This is the safest option, but the number of autobackups will accumulate.
- "Only keep backups for 30 days" - Any backups older than 30 days will automatically be deleted. Note that if you do not work on your transcript for 30 days, then when you open the transcript in DOTE, all earlier backups will be deleted automatically.
- "Smart backup solution" - This is a more sophisticated retention policy that follows these rules:
- Are there less than 20 backups in the list? If yes, don't delete anything.
- If a backup is less than 2 hours old, then is the previous backup less than 5 minutes before this one? If yes, delete it.
- If a backup is between 2-24 hours old, then is the previous backup less than an hour before this one? If yes, delete it.
- If a backup is older than 24 hours, but less 30 days, then is the previous backup less than 24 hours before this one? If yes, delete it.
- If a backup is more than 30 days old, then is the previous backup less than 30 days prior to it? If yes, delete it. Thus, with this policy, backups are kept over a longer period of time, but at increasingly longer intervals, in order to save space. It is a destructive policy in that backups in the gaps between intervals will be permanently deleted. The generous alternative is to "Never delete backups".
After confirming a change in the retention strategy, it should come into effect immediately. If not, then try closing and reopening the Autobackup panel AND/OR wait for a new autobackup to be created (after unsaved changes have been made within the designated time interval in Settings).
You can change the strategy at any time to find what works best for you.
Note: The chosen strategy is applied to ALL Transcripts, so be careful if you choose a more destructive strategy for one Transcript but then open another Transcript in which you wish to retain all or most Backups.
What is tracked by Autobackups and Checkpoints?
TODO: check with Alex
Both Autobackups and Checkpoints track the changes made to the text in the Editor panel, eg. in the transcript. This includes underlining and sync-codes, as well as Transcript Options) panel (eg. font size, margins, subtiers and conventions). Thus, if one restores (or resets) to an earlier Autobackup or Checkpoint, then not only will the Transcript revert back to the earlier state, but also the basic options for the layout of the Transcript in Transcript Options will also be reverted.
On the other hand, in regard to Checkpoints the following are not tracked: video-cues and a range of other Settings are not tracked, including active media, projection views, warning/error toggles, locking video views, muting, volume, etc. They cannot be recovered from earlier Checkpoints, but they will be recovered from earlier Autobackups.
Using GitHub and a Git GUI to collaborate on shared Transcripts
WARNING: Do not proceed unless the team are well versed in the use of Git and GitHub.
If you are experienced with using Git and you have an account on GitHub, for example, then you can share DOTE Transcripts with others and collaboratively edit them.
The transcript folder in any DOTE project is a Git root folder.
It can be synced with a repository on GitHub.
The contents of the project folder, on the other hand, will have to be manually shared amongst all the collaborators.
Checkpoints are commits on the main branch.
Collaborators can push and pull the main branch between local and origin (on GitHub) and checkpoints will be updated locally.
We recommend using a Git GUI such as GitKraken to clone and track the repository locally and remotely.
The usual advice and warnings about Git best practices apply in this use case.
Notes on DOTE and Git for advanced users
If you have never used Git software before, and you will only use it with DOTE, then read no further.
However, if you use Git for software development, for example, then be aware that DOTE automatically sets safe.directory to all ('*').
That is because if one exports and imports DOTE Projects or Transcripts, and shares those exported file(s) with others or on different machines, then without a universal safe.directory setting, those Projects and Transcripts will not be immediately importable.
It is a question of ownership and security.
Rather than the user having to issue commands repeatedly to make directories safe for Git operations, we assume that all directories are safe.
This is fine if one does not use Git for other purposes.
Read more about safe.directory.